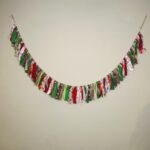
This Christmas Rag Garland project is perfect for crafters of all skill levels and works for any season or theme.
Equipment
- Wave rotary cutter
- Scissors
Materials
- Cotton fabric - Stacy used 6 different fabrics
- Non-wired ribbon small - Stacy used 4 different
- Cord for hanging
- Fabric and ribbon cut at 15”
Instructions
Prepare Your Materials
Cut Your Fabric Strips:
- Use cotton fabric folded in half (Stacy suggests 45 inches wide).
- Cut strips about 1.5 inches wide using a wave rotary cutter or scissors.
- Trim the strips to approximately 15 inches long.
- If you don’t want the decorative edge, you can simply rip the fabric by making a small cut at the edge and pulling.
Cut Your Ribbons:
- Measure ribbons to about 14–15 inches long.
- Mix ribbon widths for added texture and visual interest.
Plan Your Pattern
- Lay out your fabric and ribbon in the order you want them to appear in your garland.
- Include a mix of patterns and solids to create balance and avoid overwhelming the design.
- Stacy recommends using at least three colors or patterns for variety.
Secure Your Cord
- Anchor one end of your cord to a doorknob, desk knob, or other stationary object.
- Leave about 6 inches at the end to create a hanging loop. Tie a secure knot at the end of the cord.
Start Tying
- Take a fabric strip and fold it over the cord to create a loop. Pull the ends through the loop to knot it tightly onto the cord.
- Repeat this process, alternating fabrics and ribbons according to your pattern.
- Leave small spaces between each strip to ensure the garland lays flat and shows off every piece.
Adjust as Needed
- If your fabric flips or twists, adjust it so the pattern side is visible.
- Slide the strips along the cord as needed to maintain an even distribution.
Measure and Finish
- Continue tying until you’ve reached your desired length.
- Measure your garland to ensure it fits the space you’re decorating.
- Leave extra cord at the end for flexibility in hanging.
Add the Finishing Touches
- Create a loop at the other end of the cord for hanging.
- Trim any uneven edges, and fluff the fabric and ribbon for a full, finished look.
Notes
Choose a Theme: Coordinate your fabric and ribbon with seasonal or everyday themes like Christmas, Valentine’s Day, or birthdays.
Mix and Match: Use different textures and widths of fabric and ribbon for a layered look.
Repurpose Materials: Have non-wired ribbon you’ve been saving? This project is perfect for using up those leftovers!
Experiment with Sizes: For shorter garlands, try using smaller strips and ribbons for a "poofier" look.
Get Creative: Use a heavy-gauge wire instead of cord to shape your garland into a wreath or tree decoration.