Door hangers & how to take indoor pictures - Meghan
Materials
- 1.5” burlap ribbon sku# X501409-32 from DecoExchange
- 1.5” floral ribbon sku#R2709-WT
- 1.5” expandable burlap ribbon sku#Q640309-15
- 1.5” pink scalloped ribbon sku#RGC1302EH from DecoExchange
- 1.5” plaid ribbon from Sams Club
- Purple floral sku#60919-PU from DecoExchange
- 1.5” orange ribbon from Sams Club
- 1.5” black with white swiss dot sku#RG0365102
- 1.5” green stripe sku# 841-09-428 from DecoExchange
- 2.5” orange open weave sku#RW580420 from DecoExchange
- 2.5” butterfly ribbon sku#RGE150627
- 1.5” yellow faux burlap sku#RC500029 from DecoExchange
- 1.5” bee ribbon sku# RGA8384J3 from DecoExchange
- 2.5” polkadot ribbon sku#RG0805029 from DecoExchange
- ⅞ yellow stripe ribbon sku#RG778029 from DecoExchange
- 2.5” swiss dot with plaid from Trimzz.etsy
Instructions
Prep your base
- Start with a boxwood wreath.
Option 1: Pink and Purple Bow
Make and add your bow
- Take a 1.5” burlap ribbon (X501409-32, DecoExchange) and make a bow with 2 loops.
- Take a 1.5” plaid ribbon (Sams Club) and make a bow with 2 loops.
- Take a 1.5” pink scalloped ribbon (RGC1302EH, DecoExchange) and make a bow with 2 loops.
- Take a 1.5” expandable burlap ribbon (Q640309-15) and make a bow with 2 loops.
- Layer your bows.
- Add a purple filler flower (60919) on top.
- Take a 1.5” floral ribbon (R2709-WT) and make a bow with 1 loop and add it on top of the filler flower.
- Secure your bows and filler flower with a zip tie.
- Fluff out your bow.
- Cut a long piece of the 1.5” plaid ribbon (Sams Club).
- Place your bow to the bottom center of the wreath base.
- Wrap the 1.5” plaid ribbon (Sams Club) around the wreath base and bow.
- Make a knot.
- Trim the excess ends at and angle to make it look like it’s part of the bow.
- Trim the ends of the bow at an angle.
Option 2: Bee Bow
Make and add your bow
- Take a 1.5” yellow faux burlap (RC500029 from DecoExchange) and make a bow with 1 loop.
- Take a 2.5” swiss dot with plaid (Trimzz.etsy) and make a bow with 1 loop.
- Take a 2.5” polka dot ribbon (RG0805029, DecoExchange) and make a bow with 1 loop.
- Take a 1.5” bee ribbon (RGA8384J3, DecoExchange) and make a bow with 1 loop.
- Take a ⅞ yellow stripe ribbon (RG778029, DecoExchange) and make a bow with 2 loops.
- Layer your bows.
- Secure your bows with a zip tie.
- Fluff out your bow.
- Trim your tails at an angle.
- Add your bow to the wreath by stapling through the closest point of the bow onto the wreath.
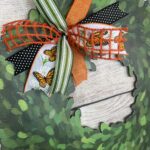
Option 3: Butterfly Bow
Make and add your bow
- Take a 2.5” butterfly ribbon (RGE150627) and measure it against the wreath and cut a piece.
- Take a 1.5” orange ribbon (Sams Club) and cut it the same length.
- Take a 1.5” black with white swiss dot (RG0365102) and cut it the same length.
- Take a 2.5” orange open weave (RW580420, DecoExchange) and cut it the same length.
- Take a 2.5” orange open weave (RW580420, DecoExchange) and cut it the same length.
- Layer your ribbon pieces and pinch it in the middle.
- Secure your ribbon with a zip tie.
- Fluff out the ribbon.
- Dovetail the ends.
- Add your bow to the wreath by stapling through the closest point of the bow onto the wreath.
HOW TO TAKE INDOOR PICTURES
Take photos of your wreath
- Make sure to have a good clean background.
- Make sure to have good lighting using box lights, ring light etc.
- Position your wreath on the background.
- Take photos of your wreath from various angles.
Take a video of your wreath
- Take a video of your wreath starting up close and moving slowly around the wreath and ending by staking a step back to show the entire wreath.