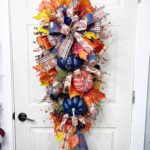
Fall Swag
Equipment
- Scissors
- EZ Bow Maker
- Hot glue pot
- Rotary Mesh Cutter
- Wire cutter
Materials
- Evergreen swag base
- 1 roll 21″ Mesh
- 3 2.5″ wired ribbon
- 1 1.5″ wired ribbon
- Fall Leaves Stem
- Fall Berry Picks
- Foam Pumpkins
- Skewers
Instructions
Prep your base.
- Start with an evergreen swag base.
- Fluff out your pine needles.
- Take some 21” burlap mesh and make a poof on one end, attach it into your swag by securing it into a pine needle.
- Keep making poofs going up the side of your swag and repeating on the other side as well as the middle.
- Take 3 different colors of mesh and cut 25” pieces.
- Make a cruffle by curling the ends in and pinching the middle together. Add it into a pine needle near the top.
- Repeat that with the rest of the cruffles spreading them evenly throughout your swag, alternating colors as you go..
Make and add your bow and pumpkins.
- Take 4 different ribbons and make a bow with 2 x 7.5” loops each side and 1 long tail and one short tail with each of them.
- Secure the bows together with a pipe cleaner.
- Fluff out your bow.
- Add your bow into the top of your swag. Secure it with a pipe cleaner.
- Trim your top ribbon ends.
- Add in your pumpkin decorations. Secure them in with skewers and hot glue.
- Take your long ribbon tails, layer them a few and make a poof, secure it down with a pipe cleaner and hot glue.
- Trim the others.
- Take some more ribbon and make tails, add them onto a pick and add them into your design.
Add greenery.
- Take some fall leaves and add them into your design.
- Take some eucalyptus and add a few pieces throughout your design.
- Take some orange berry picks and add them into your swag.
- Add in some fern type greenery into your design.
Final touches.
- Add some more funky tails where you see necessary.
- Take some navy fluffy balls and twigs and hot glue them onto your design.
