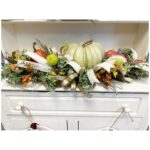
Fall Wedding Head Table Centerpiece - Tammy
Materials
- 36 inch long tan swag base Deco Exchange
- 63048 Orange Deco Exchange
- Groundsel Bush 13528GN- Polka Dot Wreath Co. (Liberty Florals)
- Seeded Eucalyptus 13293BU9- Polka Dot Wreath Co. (Liberty Florals)
- ⅞ Inch Gold glitter ribbon Michaels
- 1.5 inch cream velvet ribbon vintage Craig Bachman (bought at an estate sale by the case)
- 1.5 inch cream with gold swirl Deco Exchange
- Yellow Astilbe At Home
- Large Sage Pumpkin Hobby Lobby
- Smaller Pumpkins in orange Hobby Lobby
Instructions
Prep your base
- Start with a 36” long tan swag base (Deco Exchange)
- Fluff out your pine needles into a half garland shape.
- Cut off any excess pines.
- Take 2 x groundsel bushes (13528GN, Polka Dot Wreath Co. (Liberty Florals)) and add it to the swag using the pine tines.
- Take 9 x small seeded eucalyptus stems (13293BU9, Polka Dot Wreath Co. (Liberty Florals)) and add it along the spine of the swag using glue.
Add your pumpkins and florals
- Take a large sage pumpkin (Hobby Lobby) and add 2 x hardware mounts to the bottom of the pumpkin.
- Add pipe cleaners to the hardware mounts and secure them by twisting them.
- Add the large sage pumpkin to the center of the swag using the pipe cleaners.
- Trim the excess of the pipe cleaners.
- Add in 3 x orange filler flowers (63048, Deco Exchange) on each side of the swag, making sure to fluff them out and curl the ends.
- Take 2 x smaller orange pumpkins (Hobby Lobby) and add skewers to them.
- Add a small pumpkin to each side of the swag using glue.
Add in your greenery
- Add in a few yellow astilbe (At Home) around the swag to add some color to the green.
- Add in some more seeded eucalyptus stems (13293BU9, Polka Dot Wreath Co. (Liberty Florals)) to the swag where needed.
Make and add your bow and loops
- Take 2 x 1.5” ribbons (1x cream velvet ribbon vintage by Craig Bachman & 1 x cream with gold swirl by Deco Exchange) and layer them.
- Make 8” tails and add the ribbons to the edge of the swag using the pine needles.
- Make a roller coaster with the ribbons.
- Dovetail the ends.
- Repeat above instructions 4 x more times around the swag.
- Fluff out the loops.
- Take a ⅞“ gold glitter ribbon (by Michaels) and cut a few pieces for funky tails.
- Take the ⅞“ ribbon and make funky tails, each with 5” loops.
- Add the funky tails to a few spots on the swag.
- Trim the tails at 45 degree angle.
- Curl the ends.
- Take the 2 x ⅞“ gold glitter ribbons (by Michaels) and 2 x bows with 8 x 6-7” loops each.
- Secure your bows with zip ties.
- Fluff out your bows.
- Add a bow to the front and back of the swag using the pine tines or by adding a pipe cleaner to the bow and gluing it in.
Final touches
- Add in some fluffy ball greenery around the swag using glue.
- Add in some more funky bows where needed using the ⅞“ gold glitter ribbon (by Michaels).