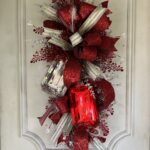
Red and Silver Gem Swag
This swag would work great for Christmas or Valentine's Day
Equipment
- Scissors
- Wire Cutters
- Zip Ties
- Supplies
Materials
Base:
- 1 silver tinsel tree extender branch MTX70070-SILV
Florals
- 3 silver 60919 63526-SILVER
- 3 red tinsel spray 84576-RD
- 2 jingle bell sprays BM1817RD/WT
- 3 maidenhair fern XS236724
Accessories:
Ribbon:
- 1 1.5” iridescent stripes ribbon RK296-53
- 1 2.5” glitter vertical stripe ribbon RGC1614W7
Instructions
Prep Your Base:
- Use a silver tinsel tree extender or swag base to create a sturdy foundation.
- Bend the top of the swag to form a hook for easy hanging. Zip-tie this loop to secure it in place.
Assemble the First Bundle:
- Start with your tinsel spray as the first layer. This adds a vibrant, vintage touch with its shiny texture.
- Layer in your red and silver floral sprays on top of the tinsel.
- Add the 60919 spray on top of that, making sure the stems align.
- Next, insert maidenhair fern for extra texture. Be sure to fluff the fern by shaping the wired stems for a fuller look.
- Zip-tie all stems tightly together just below the middle of the bundle. Ensure the sprays are positioned in a triangular shape for balanced coverage.
- Secure the top portion with another zip tie, ensuring the stems are tightly bundled and ready for the next layer.
Create the Second Bundle:
- Repeat the same process: layer tinsel spray, floral sprays, 60919 spray, and maidenhair fern.
- Make sure everything is layered neatly on top of each other to maintain the fullness and symmetry of the swag.
- Zip-tie this second bundle together tightly.
Combine Both Bundles:
- Place the second bundle slightly below the first one on the swag base, overlapping them slightly to blend the transition.
- Secure them with zip ties along the central spine of the base, ensuring all the pieces stay together without gaps.
Add Decorative Gems:
- Place your red and silver gem picks strategically along the swag, angling them slightly for visual interest.
- Use the wired tinsel pieces from the sprays to tie them in securely (no glue needed!).
- If the gems shift, use a mounting square with pipe cleaners for extra support and stability.
Create and Attach the Bow:
- Use a double-sided ribbon with red and white stripes on one side and glitter on the other.
- Make a large bow, measuring out about 12-inch loops for a nice full look.
- Attach the bow to the swag using the tinsel ties or additional zip ties to secure it in place.
- Ensure that the tails of the bow are spread out and curled for a polished, flowing effect.
Final Touches:
- Add ribbon tails throughout the design using the tinsel ties for additional layers and depth. You can also mix in silver designer ribbon for more sparkle.
- Optionally, sprinkle in snowflakes or Valentine’s heart picks depending on the occasion. These can be wired or glued into the swag for added detail.
Secure and Fluff:
- Once all elements are attached, go through and fluff the sprays and ribbon to ensure the swag looks full and balanced.
- Double-check that all stems are secured along the central spine and that there are no sharp edges that could scratch doors or walls.