Prep Base
Remove the initial bow but leave the ribbon that is wrapped around the cane
Cut a small piece of styrofoam block
Cut a small piece of nub or skewer
Punch hole in center of foam block and add stick with hot glue
Push stick into center of the project
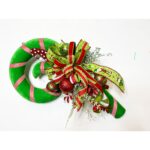
Make a Bow
Make 14” tails, pinch, twist, and make 3 large loops; tie together with pipe cleaners
Make 14” tails, pinch, twist, and make 2 loops slightly smaller than the first layer; tie together with pipe cleaners
Make 14” tails, pinch, twist, and make 3 loops slightly smaller than the 2nd layer; tie together with pipe cleaners
Make 14 “ tails, pinch, twist, and make 4 loops slightly smaller than the previous layer; tie together with pipe cleaners
For extra security, use zip tie to cinch all layers together
Fluff out loops and tails
Decide which tails will go up or bottom and dovetail
Using straight pins or floral pins, attach bow to foam block
If needed, take an extra piece of ribbon and tie it through the bow and around the back of the project
Finishing Touches
Cut all floral stems/sprays/picks off the main stems
Begin adding leaf spray pieces under the bow; hot glue into the foam block
Add the longest piece lower center of the bow and adding smaller pieces around the lower half of the project
Add a nub (or skewer) for length to one of the floral stems with floral wire
Layer on top of the first leaf spray and into the foam block with hot glue
Fill in with other bush stems throughout the bow with hot glue in the block
Take elf hats and add skewers with floral wire
Add to top of foam base with hot glue; as well as the bottom
Add ball ornaments throughout the bow with hot glue, keeping the length
Check to see if any mechanics are visible; if so add some florals or move some around to hide
Curl the long tails
If using a one directional ribbon as a tail, if going the wrong way, cut off and make a pick out of it going the right direction and add to foam block